How to Putt: A Complete Guide to Better Putting
*We may earn a commission for purchases made using our links. Please see our disclosure to learn more.
Putting looks like the simplest part of golf. There is no full swing, no need to generate tremendous clubhead speed, and no ball flying hundreds of yards through the air. Yet putting can be one of the most frustrating parts of the game.
A good putting stroke depends on more than simply pointing the putter at the hole and pushing the ball toward it. You need to read the green, choose the right starting line, control your speed, aim the putter face accurately, and make a repeatable stroke.
For beginners, the good news is that you do not need a technically perfect putting motion to become effective on the greens. Many successful golfers use different grips, stances, putters, and stroke styles. What matters most is producing predictable results.
Golf Digest putting coach Phil Kenyon identifies three essential putting skills: starting the ball on your intended line, controlling its speed, and reading the green correctly. When those three skills work together, putting becomes much simpler.
“There are four keys to putting: set-up, path and clubface, rhythm and tempo, and mental focus.”
Source: PGA professional Larry Rinker, PGA.com
Key Takeaways
- Good putting comes down primarily to start line, speed control, and green reading.
- Build a comfortable setup you can repeat instead of trying to copy one exact professional technique.
- Aim the putter face carefully because small errors at impact can send the ball away from your intended line.
- Use your shoulders to create a smooth rocking motion while keeping excessive hand and wrist action to a minimum.
- Distance control is especially important on longer putts because it helps prevent three-putts.
- Develop a consistent pre-putt routine so you approach every putt with the same process.
- Practice short putts, start-line drills, and long-distance lag putting rather than simply hitting random balls toward a hole.
4 Putting Products Worth Considering
Training aids are most useful when they provide clear feedback. They should tell you something about your setup, start line, strike, or speed rather than simply giving you another object to use.
1. Perfect Practice Perfect Putting Mat


The Perfect Practice Compact & Portable 8' Putting Mat is designed for golfers who want a practical way to work on their putting indoors without taking up too much space. Its crystal velvet surface is made to provide a smooth, consistent roll, while built-in alignment guides and pace markings help with setup, direction, and stroke control. The automatic ball return keeps practice moving without having to retrieve each ball, making it convenient for regular practice at home or in the office.
- Space-Saving Design: The compact 8-foot length works well in smaller rooms, apartments, and offices.
- Automatic Ball Return: Sends the ball back after each putt for faster, more continuous practice.
- Helpful Alignment Guides: Built-in markings make it easier to practice start line and putting consistency.
- Single Practice Hole: Offers less target variety than mats with multiple holes.
- Indoor Focus: Best suited to controlled indoor practice rather than outdoor green conditions.
- Premium Price: Costs more than many basic putting mats.
Best for building a consistent home practice routine
The Perfect Practice Putting Mat provides alignment markings that can help you monitor starting direction and stroke consistency. Its different target sizes also make it useful for creating progressively more difficult short-putting challenges.
For golfers who struggle to practice consistently, having a dedicated surface readily available can make daily five- or ten-minute sessions much easier.
Golf Monthly selected the Perfect Practice mat as its top putting aid in its guide, particularly highlighting its visual feedback and usefulness for start-line practice.
2. PuttOUT Premium Pressure Putt Trainer


The PuttOUT Premium Pressure Putt Trainer is designed to help golfers improve both putting accuracy and pace control. Its curved ramp simulates the behavior of a real golf hole by returning successful putts based on how far they would have rolled past the cup, while off-line attempts are rejected. A small micro-target adds an extra challenge by requiring precise speed and direction. Its lightweight, foldable design also makes it easy to use indoors or outdoors.
- Realistic Feedback: The ramp helps show how accurate and well-paced each putt would be around a real hole.
- Precision Training: The micro-target encourages golfers to improve both starting line and speed control.
- Portable Design: Lightweight and foldable construction makes it easy to practice in different locations.
- Small Target: The micro-target can be challenging and potentially frustrating for newer golfers.
- No Putting Surface: Requires a separate mat, carpet, or suitable outdoor surface.
- Limited Drill Variety: Primarily focuses on accuracy and pace rather than full putting setup or stroke mechanics.
Best for pace control
The PuttOUT Premium Pressure Putt Trainer is designed to reward accurate speed.
Instead of simply rolling putts toward a normal cup, the trainer returns imperfect attempts according to how much pace they carry. This creates immediate feedback and gives you a specific challenge instead of mindlessly hitting ball after ball.
It is especially useful for golfers who regularly leave putts several feet short or race them well past the hole.
Golf Monthly’s putting-aid testing specifically recommends it for improving understanding of pace control.
3. ME AND MY GOLF Mini-max Mini Max Golf Training Mirrors


The ME AND MY GOLF Mini-Max Golf Training Mirrors are designed to give golfers immediate visual feedback on their putting setup, posture, and stroke. The mirror system can help you check eye position, shoulder alignment, hand movement, and putter positioning before and during the stroke. An adjustable stand allows the mirror to be positioned from different angles, making it useful for both putting practice and general swing setup. The product also includes access to instructional training videos with drills and coaching guidance.
- Instant Visual Feedback: Helps golfers check eye position, shoulders, hands, and putter alignment during practice.
- Adjustable Positioning: The stand can be angled to provide different views of your setup and movement.
- Training Support: Includes access to instructional videos with drills for getting more from the training aid.
- Requires Proper Placement: The mirror needs to be positioned correctly to provide useful feedback.
- Limited Pace Training: Focuses more on setup and mechanics than putting speed or distance control.
- Learning Curve: Beginners may need time to understand which positions and movements they should be checking.
Best for checking putting setup and alignment
It can be hard to tell whether your eyes, shoulders, hands, and putter are properly positioned when practicing on your own.
The ME AND MY GOLF Mini-Max Golf Training Mirrors make those details easier to see.
The mirrors provide instant visual feedback on eye position, shoulder alignment, hand movement, and putter setup, helping golfers spot small inconsistencies before they become habits.
The adjustable stand also lets you change the viewing angle, making it useful for checking different parts of your setup and stroke.
The included training videos add extra guidance for golfers who want structured drills alongside the visual feedback.
4. SKLZ Accelerator Pro Indoor Putting Green


The SKLZ Accelerator PRO is a 9-foot indoor putting mat designed to help golfers improve accuracy, stroke consistency, and distance control. Its true-roll surface is made to provide a smooth, predictable roll, while alignment guides at 3, 5, and 7 feet help with putter-face position, backswing length, and follow-through. The adjustable gravity ball-return system sends balls back after each attempt, allowing for continuous practice without frequent interruptions. A rubber-backed base helps keep the mat stable on hardwood, tile, and carpet.
- Multiple Practice Distances: Alignment guides at 3, 5, and 7 feet provide structured short-putt practice.
- Automatic Ball Return: Adjustable gravity return keeps practice sessions moving with less ball retrieval.
- True-Roll Surface: Designed to provide a consistent roll for more repeatable indoor practice.
- Requires Floor Space: The 9-foot length may be difficult to accommodate in smaller rooms.
- Straight-Putt Focus: The flat surface offers limited practice for breaking or sloped putts.
- Higher Price: Costs more than many basic indoor putting mats.
Best for repeatable short-putt practice
The SKLZ Accelerator Pro provides marked putting distances at three, five, and seven feet along with an automatic ball-return system.
Those distances are useful because they allow you to repeatedly practice the short and medium-length putts that frequently appear during a round.
The alignment markings also make it easier to monitor whether you are consistently starting the ball on your intended line.
A current comparison lists the nine-foot model as a strong overall choice for beginners and notes its alignment guides and ball-return design.
What Makes a Good Putt?
Every putt has two basic requirements: direction and speed.
Direction determines where the ball begins rolling. Speed determines how far it travels and how much it reacts to the slope of the green.
Those two factors are connected.
Imagine a downhill putt breaking from right to left. Hit the ball softly and gravity has more time to move it left. Hit it firmly and the ball may hold a straighter line.
That means there is rarely one independent “perfect line.” Your chosen line must match your intended pace.
This is why repeatedly practicing mechanics without practicing speed and green reading can only take your putting so far.
How to Putt Step by Step
Step 1: Read the Green Before Addressing the Ball
Your putting stroke begins before you touch the ball.
Start behind the ball and look toward the hole. Try to identify the overall slope between your ball and the cup.
Ask yourself whether the putt is uphill, downhill, left-to-right, right-to-left, or relatively straight.
Pay attention to the final several feet around the hole. As the ball slows down, the slope tends to influence its movement more noticeably.
For a breaking putt, choose a specific starting point rather than simply aiming vaguely to one side of the hole. This might be a discoloration in the grass, an old ball mark, or an imaginary point along your intended line.
Once you have selected your line, commit to it.
Constantly changing your read while standing over the ball often creates indecision.
Step 2: Hold the Putter Comfortably
There is no single putting grip that every golfer must use.
The conventional grip places the lead hand above the trail hand. Another popular option is the reverse-overlap grip, where the lead index finger rests across the fingers of the lower hand.
Some golfers use left-hand-low, also known as cross-handed putting. Others use claw-style grips.
For a beginner, start with a conventional grip unless you have a reason to change.
The important thing is grip pressure.
Avoid squeezing the putter tightly. Excess tension can make your forearms rigid and encourage jerky movements.
Think of holding the putter securely enough that you maintain control but lightly enough that the head can move naturally.
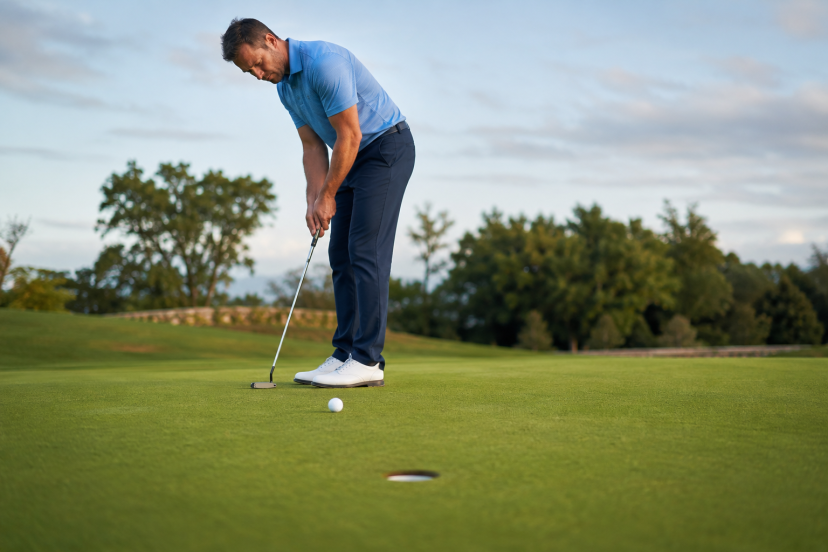
Step 3: Build a Balanced Putting Setup
Stand with your feet approximately shoulder-width apart or slightly narrower.
Flex your knees gently and bend forward from the hips. Allow your arms to hang naturally beneath your shoulders.
Your weight should feel balanced rather than dramatically favoring your heels or toes.
Position the ball around the center of your stance or slightly forward of center. Many golfers prefer having their eyes directly above the ball or slightly inside the target line.
PGA coaching guidance similarly emphasizes a comfortable stance, light grip pressure, appropriate eye position, and ball placement around the middle or slightly forward in the stance.
Comfort matters.
If your position feels extremely forced, maintaining the same setup throughout an entire round becomes difficult.
Step 4: Aim the Putter Face
One of the most overlooked putting skills is simply aiming the putter correctly.
Choose your starting line first.
Then place the putter behind the ball and aim the face perpendicular to that line.
Only after the face is positioned should you settle your feet and body into your stance.
Do not automatically assume your feet have to aim directly at the hole. On a breaking putt, the ball’s starting line may be several inches or even feet away from the cup.
Golf Digest notes that putter-face angle has an enormous influence on initial ball direction, making face control one of the most important elements of accurate putting.
Step 5: Make a Smooth Putting Stroke
A simple way to picture the putting stroke is as a gentle rocking motion of the shoulders.
Move the putter away from the ball without suddenly snatching it backward.
Then allow it to return through the ball with a smooth, natural rhythm.
Your wrists do not need to be completely frozen, but excessive wrist action generally makes it harder to control the putter face and strike location consistently.
Avoid deliberately steering the putter straight backward and straight forward at all costs.
Because the putter shaft sits on an angle rather than vertically, many putting strokes naturally move on a slight arc. Trying to artificially manipulate the face throughout the motion can create more problems than it solves.
Your goal is not to create a visually perfect stroke.
Your goal is to create a stroke you can repeat.
Step 6: Strike the Ball Solidly
Consistent contact matters because off-center strikes can influence both direction and distance.
Try to contact the ball near the center of the putter face.
Keep your head relatively stable through impact rather than immediately turning to watch the ball.
You do not need to keep your head frozen for several seconds. Simply avoid reacting so early that your upper body moves before the putter reaches the ball.
After contact, allow the putter to continue naturally.
Do not jab at the ball and stop the putter immediately.
How to Control Putting Distance
For many recreational golfers, distance control produces faster improvements than obsessing over tiny technical changes.
Long putts are rarely expected to go in. The primary objective is to leave the ball close enough that your second putt is comfortable.
One useful approach is to control distance primarily through stroke length.
A short putt requires a shorter motion. A long putt requires a longer motion.
Your tempo can stay relatively similar.
Avoid creating longer putts simply by suddenly hitting the ball harder with your hands. That tends to make distance control inconsistent.
The PGA has also highlighted research suggesting that visual focus on the distant target can improve aspects of pace control. Research discussed by Dr. Sasho MacKenzie found improved distance control under a far-target visual strategy in putting tests.
You do not necessarily need to look at the hole while actually putting, but the research reinforces an important principle: spend enough time looking at and feeling the distance rather than becoming completely absorbed in your stroke mechanics.
How to Read Breaking Putts
Green reading improves with experience, but beginners can follow a simple process.
Start by looking at the entire green as you approach your ball. Large slopes are often easier to recognize from a distance than when standing directly above your putt.
Next, examine the area between your ball and the hole from behind the ball.
If you are uncertain about the break, viewing the putt from the low side can sometimes make the slope easier to see.
Pay particular attention to the area around the cup.
Then select a start line and decide how firmly you want the ball to reach the hole.
Remember that slower putts generally react more to slope.
A ball dying toward the cup may break considerably more than a firm putt traveling along a similar route.
Short Putts vs. Long Putts
The objective changes depending on distance.
From three or four feet, starting the ball accurately becomes extremely important. Practice developing a clear target line and confidently rolling the ball along it.
From 20, 30, or 40 feet, your main objective should usually be distance control.
Trying desperately to hole every 40-footer can encourage overly aggressive putting.
Instead, imagine a circle around the hole.
Your goal is to roll the first putt into that area and leave an easy second putt.
This is known as lag putting.
Excellent lag putting can save numerous strokes because it reduces three-putts even when you are not making many long putts.
Common Putting Mistakes
Looking Up Too Early
Golfers naturally want to see whether the ball is going into the hole.
Unfortunately, turning your head before impact can move your shoulders and change the putter face.
Focus on completing the stroke first.
Gripping the Putter Too Tightly
Pressure situations often cause golfers to tighten their hands without realizing it.
Excessive tension can interfere with rhythm and feel.
Take a moment before putting to soften your hands and forearms.
Decelerating Into the Ball
Some golfers make an unnecessarily long backswing and then slow the putter before impact.
This makes speed difficult to predict.
Use a backswing appropriate for the distance and allow the putter to move smoothly through the ball.
Trying to Guide the Ball
Once you have selected your line and aimed the face, trust your stroke.
Trying to manipulate the putter during the downswing often leads to pushes, pulls, and inconsistent contact.
Practicing Without a Goal
Rolling 30 balls toward a hole may feel productive, but it provides little feedback unless you are measuring something.
Give each practice session a purpose.
Work specifically on starting direction, short-putt consistency, distance control, or green reading.
Three Putting Drills That Actually Help
The Gate Drill
Place two tees slightly wider than your putter head and stroke balls through the gate.
This provides immediate feedback about your path and centeredness.
You can also create a smaller ball gate several inches in front of the ball. If the ball passes through it, you know your initial direction was close to your target.
The Ladder Drill
Place markers approximately 10, 20, 30, and 40 feet away.
Putt one ball toward each distance without trying to hole anything.
Your objective is simply to stop each ball near its target.
This forces you to change stroke length while maintaining rhythm.
The Three-Foot Circle Drill
Place several balls approximately three feet from the hole in different directions.
Putt each ball using your complete routine.
Do not simply stand in one position and rake another ball into place.
This introduces changing reads and helps short-putt practice resemble actual golf.
Build a Consistent Pre-Putt Routine
Good putters tend to approach putts consistently.
Your routine does not need to be long.
Begin behind the ball and read the putt.
Choose your intended speed.
Select your starting line.
Take one or two practice strokes if they help you feel the distance.
Address the ball.
Aim the putter face.
Look at your target one final time.
Then make the stroke.
Once you are standing over the ball, avoid restarting the entire debate about speed and break.
The decision-making phase is finished.
Now your job is simply to execute.
PGA instruction surrounding elite putting emphasizes the same process-oriented idea: establish a clear start line, match speed to break, and commit to the stroke rather than judging yourself solely by whether every putt falls.
How Often Should You Practice Putting?
You do not need hour-long sessions every day.
Ten to twenty minutes of focused practice several times per week can be more productive than occasionally spending an hour hitting random putts.
Divide your practice among three areas.
Spend some time on short putts where starting direction matters most.
Spend some time on longer putts where distance control becomes the priority.
Finally, practice putts with different slopes so you learn how line and speed interact.
Most importantly, measure your results.
For example, track how many three-foot putts you make out of 20 or how many 30-foot putts finish within three feet of the cup.
Improvement becomes easier to recognize when you have something objective to compare.
Frequently Asked Questions
How should a beginner putt a golf ball?
A beginner should start with a comfortable stance, light grip pressure, and the ball near the center or slightly forward in the stance. Aim the putter face toward the intended starting line and use a smooth shoulder-driven motion to roll the ball. Focus first on solid contact and speed control rather than attempting to create a technically perfect stroke.
Should you look at the ball or the hole when putting?
Most golfers look at the ball during the stroke, which is perfectly effective. However, research has also examined “heads-up” putting in which golfers focus on a distant target, with evidence suggesting potential benefits for distance control. Beginners should generally use whichever method allows them to make consistent contact while maintaining good awareness of the target.
Should your putter go straight back and straight through?
Not necessarily. Because of the angle of the putter shaft and the way the body moves, many natural putting strokes travel on a slight arc. You do not need to force the putter into a perfectly straight path. What matters is returning the face consistently at impact and starting the ball where you intended.
How can I stop three-putting?
Improve your distance control from approximately 20 to 50 feet. Instead of trying to make every long putt, focus on leaving the first putt close enough for a comfortable second putt. Practice lag putting frequently and track how many balls you can finish inside a three-foot circle around the hole.
What is the fastest way to improve putting?
Improve one skill at a time. Start by developing a repeatable setup, then work on starting the ball on your chosen line. Once your short-putt direction becomes reliable, spend significant practice time on distance control. Combine those skills with better green reading and a consistent pre-putt routine.
Final Thoughts
Learning how to putt well does not require copying another golfer’s stroke or constantly changing your technique.
Start with the fundamentals.
Build a comfortable setup. Aim carefully. Make a smooth, repeatable stroke. Learn to control distance. Spend time reading greens instead of treating every putt as straight.
Above all, practice with a purpose.
A golfer who learns to start short putts on line and consistently leave long putts close to the hole can dramatically reduce unnecessary strokes without changing anything about their driver or iron swing.
Putting may look simple, but becoming a reliable putter comes from combining direction, pace, green reading, and confidence into one repeatable process.